SharePoint site with InfoPath forms and Random session lost issue

We were able to fix a sticky issue which was bugging us since a long time. Its a sporadic issue and its always interesting to debug issues like these.

Issue details: This is in reference to SharePoint portal site which uses InfoPath Forms extensively which was extended into multiple zones (intranet, extranet) with dual authentication (AD and LDAP with MFA/FBA). The issue with the site was that it was losing the session randomly while the user is actively working on it. The random time period could be anywhere from 8 mins to 20mins or more.

Debugging the issue: We started facing this issue in our (staging/no-harm) environment and later we realized it wasn’t isolated to a specific environment as this was reproducible in our QA, UAT etc environments too. Changing or increasing the session timeout value was certainly not having any kind of effect on the random timeout issue. That was ruled out of the picture. I started looking into SharePoint logs, IIS logs and Application specific event logs, still hitting the wall.

With the infrastructure we have one hits the SharePoint site through a multi-factored authenticated (MFA) site which is basically a single point of entry for external partners. This MFA site authenticates using SiteMinder/LDAP. The extranet forms based authenticated (FBA) based SharePoint site picks up the user context from this site without prompting the user to log in again.  The next step was pushing this issue to the MFA/Application-security team to verify if all is well from their side.  Yes, everything remains the same and fine on their side.

We have been using Fiddler/HTTPWatcher to track the http headers exchanged while trying to reproduce the session lost issue. After tracking down the HTTP headers while reproducing the session lost I found that the ASP.NET_SessionId cookie which was supposed to be sent in the header is  not being sent at that moment and thus session is lost.

Below is a small useful excerpt from a blog link:

How a web application uses cookies to maintain session state is simple: the application framework simply associates all the runtime state of the application with the ID (i.e. SessionID) and makes sure to send that ID with a Set-Cookie on the initial HTTP response, and whenever the web browser makes a subsquent request to the application’s URL namespace, the application framework inspects the cookie header for an ID and if it is found, look up all of the associated runtime state and continue processing the web application with that state. Good application frameworks would also control the time period of validity for this runtime state via something like Session

But now the question arises about what and why this is happening? Why does the browser stop sending the ASP.NET_SessionId cookie randomly?

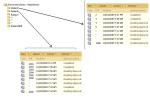
One thing that I noticed is that there are multiple cookies that are maintained and the number of cookies are increasing for each page refresh or access. On close observation we narrowed it down that on page access that has an XMLFormView control which contains the InfoPath form is adding 2 cookies which look something like below:

2877de91-2fc1-48bd-b134-7e5480751aa1_sel    Sent        /    test..com    (Session)

2d12188c-1f35-427c-b741-634acde50a8e_pb    Sent    0    /    test.com    (Session)

I couldn’t find any good documentation/links on how InfoPath Forms Services use cookies especially the above ones. However, the _sel and _pb represents the selection and postback cookies.

As the number of cookies are increasing and as it exceeds the browser limitation of max 20 cookies per domain the ASP.NET_SessionId is dropped and thus the session is lost.  Here is the copy one of the lines from Microsoft KB Article:

If a Web application uses more than 19 custom cookies, ASP session state may be lost.

In order to conclude this I wrote a quick and dirty (my favorite) java script solution to remove the InfoPath form cookies that are not used or empty and retain only the latest 2 cookies. With this script plugged into the master page the session lost issue never happened again.

I uploaded the script to SkyDrive. Here is the link to the folder and you will see a file named: CookieCleanupScript.txt

https://skydrive.live.com/redir?resid=52790689DEA81341!6040

Synch Options from Microsoft Excel to SharePoint

Depending on the business case one of the following options should be a valid one.  It depends on the infrastructure too. There are a few limitations, variations and difference in concept depending on the requirements, for example if the use case involves only Excel 2003 usage, the process of porting data from Excel to SharePoint concept is called Publishing, where as if its Excel 2007, the process is keyed as Exporting. This difference is because

Excel 2003, out of the box (OOTB) it has the ability to synch 2 way with SharePoint.

Excel 2007, OOTB has the ability to do only 1 way synch. Although Microsoft released a add in to make 2 way synch possible.

In either case once the export/publishing is done the data in SharePoint should be considered as the master data.

1. MS Office Excel 2003 – 2 way synch is possible [Publish to SharePoint]
http://office.microsoft.com/en-us/excel/HA010843681033.aspx?pid=CH062528481033
http://office.microsoft.com/en-us/excel/HP010317191033.aspx

2. MS Office Excel 2007 – 1 way synch. (with add in 2 way synch is possible) [Export to SharePoint]
http://msdn.microsoft.com/en-us/library/bb462636%28office.11%29.aspx (Addin 2 way synch)
http://office.microsoft.com/en-us/excel/HA101314721033.aspx One way synch (SP to Excel)

3. General
http://mindsharpblogs.com/Penny/archive/2007/06/15/1888.aspx

4. Publishing Excel Workbooks to SharePoint so that users without MS Office can access complex spreadsheets in Browser
http://blah.winsmarts.com/2007-3-SharePoint_2007__Excel_Services_-_A_Quick_Introduction.aspx

Workaround: Format SharePoint number column to remove commas

Let’s say you have a column named “TicketNumber” of number type in your list. By default SharePoint formats it to show with commas. If your requirement is not to show those comma’s then here is a workaround.

Create another column of  ‘Calculated’ column type and set the formula as follows:

=TEXT(Original_Number_Column_Name,”0″)

Ex: =TEXT([TicketNumber],”0″)

And then use the calculated column in place of your original column for display purposes.

Versioning SharePoint Workflow

Lets say you developed and deployed a complex state workflow using Visual Studio with WSPBuilder add on. Things are going smooth and the business came up with new set of requirements/changes to the workflow. What would be your approach?

You cannot just modify/update the Visual Studio project according to the new requirements and deploy it. This might entirely mess up your existing workflow items, especially the workflow instances which are in waiting mode i.e waiting for an external event are serialized and persisted in the SharePoint content database. When you deploy your modified workflow and when the workflow engine tries to deserialize the existing instance from DB it might fail as it cannot match with the updated workflow dll and thus end up halting the workflow process.

There is no out of the box solution to maintain versions of the same workflow. However there are workarounds to it. Please read this blog entry which is widely accepted and implemented.

The basic idea is to create a complete new workflow project with different name and solution id. Then deploy it and attach to the same doc. library. Then using the doc. library workflow settings select “no instances” for the old workflow and “allow” for the new workflow. This will attach the new workflow for any new items and the existings items will still continue with the old workflow.

**If you are using InfoPath form to build the workflow task form then make sure that you have a new version of the infopath form with a different name.

Follow the below steps to easily make a new version of the existing workflow project:

  1. Create a new project based on the WSPBuilder with Workflow project template and name it as same as your old workflow name appended with the version number. Ex. MyCompany.StateWorkflow.Ver2
  2. Now right click the project and new state workflow project item from the WSPbuilder items. Provide the same name as exists in the old workflow project so that it creates the .CS and .Designer files with the same name.
  3. Copy the .CS and .Designer files from your old workflow project to the new project replacing the newly created ones.
  4. Compile and make sure the project is having no build errors.  Its almost done.
  5. Next steps would be to modify the workflow/elements xml files to bring it up to speed with the old workflow xml file entries. Also, make a new copy of the InfoPath task form name it appending the version number and copy to the new project structure.

The above may not apply for everyone and may not apply for SharePoint 2010 workflow. I documented the above steps so that I can come back and follow them whenever required.

SSRS: Logon failed. (rsLogonFailed) or Logon failure: the user has not been granted the requested logon type at this computer

Logon failed. (rsLogonFailed)

Logon failure: the user has not been granted the requested logon type at this computer. (Exception from HRESULT: 0x80070569)

Solution:

Add the user account which you provided for the ‘Execution Account’ in the Reporting Services Configuration Manager to the local Administrators group.  By default the ‘Administrators’ group is added the ‘Content Manager’ role by SSRS so when you add the execution account to the administrator you are giving that user the ‘Content Manager’ role/permission. I am not sure neither if this is the best solution nor the only solution for the above error. The solution might vary on the setup and environment.

Static variables issue in shared hosting or multiple web servers

I just want to share with everyone a lesson learned recently.

Issue: All the static variables which are initialized as class variables are reset to empty, null or 0 depending on the data type of the variable. This happens randomly and cannot be reproduced in the development environment. This issue is specific to web applications and not stand alone/windows apps.

Explanation: Firstly to clarify what I meant by “static variables which are initialized as class variables“, below is an example code snippet.

public class MyUtility
{
static string myURL = “http://somesite.com”;
static int count = 10;


}

In the above code snippet, the variables ‘myURL’ and ‘count’ will be set to empty string and ‘0’ respectively at any time randomly on your production servers if its a load balanced servers and or shared hosting environment. The static variables are initialized properly the first time when the application starts. But whenever the application domain which is the isolated memory in which the web application process runs is reset or recycled all the memory allocated is lost. The application domain reset/recycling is possible in multiple cases. For example:

  • If the web application is not requested for an extended period of time.
  • In shared environment multiple web applications share the limited RAM. Thus, if one web app is idle and doing nothing that will be unloaded and reloaded on demand.
  • The IIS server settings can be set to recycle/reload the application pool periodically or set to recycle whenever the memory allocation exceeds a threshold limit.

Whenever this recycling or reload occurs all the static variables are reset. Not only do these not get reset to their original state but they are also not re-initialised with their design time default values. They will always be given values like null, empty string and zero.  The worst part is that we cannot reproduce this in our development environment as we don’t mimic the production environment.

So the solution is simple, do not use static variables in web applications.

Below is a very good post which mentions more technical details related to this topic.

http://www.navwin.com/Topics/AppDomainRecycling/AppDomainRecycling.aspx

ShareTools Kit – Consolidating multiple SharePoint Helper Tools

Project Description
This is a portal for all of my tools developed to ease a sharepoint developer/admins job.

Update (12/15/09)

Initially this project was created to point to other projects of mine. After putting a good thought I decided to bring all tools into one spot and build a consolidated tool which encompasses all others. I was able to do a total revamp of the project structure and updated the source code control.
Also uploaded the latest release in the downloads section.

The tool is designed as a multiple document interface (MDI) thus at any given point one can access any tool within single window. Below is the list of the nifty tools built so far:

Below are the screens:

http://sharetools.codeplex.com/

Solution to handle large SharePoint lists or library

SharePoint has limitations at various levels. Below is a quick information table:

Container

[recommended limitation of contents]

Web Application

[150000 Site Collections ] (with the limit of 50000 per content db)

Site Collection

[250000 sites ]

Site

[2000 sub sites/sites]

Site/Sub site

[2,000 libraries and lists]

Library/List

[10,000,000 documents/items  and 2,000 items per view]

The above are recommended limitations by Microsoft. Please read the article from MSDN for detailed information and benchmarks. However these limitations vary depending on the hardware specs (YMMY): databases, web applications and the arrangement of sites/site collections. Joel Oleson[MVP] has provided a limitations chart based on his real time experience.

Below is an excerpt from a white paper released by Microsoft on handling very large lists.

For typical customer scenarios in which the standard Office SharePoint Server 2007 browser-based user interface is used, the recommendation is that a single list should not have more than 2,000 items per list container. A container in this case means the root of the list, as well as any folders in the list — a folder is a container because other list items are stored within it. A folder can contain items from the list as well as other folders, and each subfolder can contain more of each, and so on. For example, that means that you could have a list with 1,990 items in the root of the site, 10 folders that each contain 2,000 items, and so on. The maximum number of items supported in a list with recursive folders is 5 million items.

Based on the above excerpt and simplifying it further we can achieve a viable scalable and highly available solution to implement very large lists. Here I am going to discuss a use case which involves large lists and how it can be handled.

Use case/Problem case:

Highly used sharepoint site where user submits requests using various infopath forms which are submitted to the document libraries which has custom workflow attached to it. On an average there would be around 900 to 1000 requests submitted per day.

Proposed Solution:

With the usage rate mentioned in the above use case the list will have accumulate 200000 items in the document library within the first six months. Much against to this the recommended limit is to have 2000 items per list/library before it starts showing a degradation in the performance. The only way to get around this limitation is to use folders within the library and distribute the items/files within these folders. We can even have nested folder structure. The maximum number of items supported in a list with recursive folders is 5 million items. But having a recursive folder structure means more complexity and as data grows there will be manageability concerns. Without using recursive folder structure and thus using a simple solution we can have 4 million items in a single list/library.

The solution is very simple; We will have 2000 folders in a library (since 2000 is the limit on number of items a library can have). Then each folder will have 2000 items within it. Thus the total number of items the library holds with this approach is 2000 * 2000 which is 4 million.

Implementation Details

Assumption: This implementation is based on the assumption that every new infopath form request submitted will be assigned a unique auto-incremented integer as the identifier. This can be implemented by using custom sql database table with an auto-increment integer column. For each form request submitted a new row will be inserted which will assign an unique integer to it.

The integer id assigned to the request submitted forms the crucial part of this solution. Using this we can identify where to store a new request and what is the location/url of an existing(already saved) request item. This comes in very handy in various places (like sending email with item url, building custom views over the lists, restoring data etc).

To determine the library/list to which the request/item will be saved will be determined by the following algorithm.


Input: [itemid : integer]
step 1: set variable thresholdItems = 2000
step 2: var delta = itemid/(thresholdItems*thresholdItems)
step 3: delta = Math.Ceiling(delta);
Output: “Repo”+ delta

Sample Runs:

Input Output
2000 Repo1
6500 Repo1
2300300 Repo1
4000000 Repo1
4000001 Repo2

As we can observe in the above table the until the item id is 4 million i.e 4000000 the library name is Repo1 and from 4000001 onwards the library name changed to Repo2. Similarily the next library Repo3 is required for the item id = 4000001 + 4000000 = 8000001. So on and on…

Note: We can utilize elevated privilege code to create the library with the required name on the fly whenever it is needed.

To get to the folder to which the item will be saved with in the library use the following algorithm.


Input: [itemid : integer]
step 1: set variable thresholdItems = 2000
step 2: var delta = itemid/(thresholdItems)
step 3: delta = Math.Ceiling(delta);
Output: delta

Sample Runs:

Input Output
1 1
837 1
2000 1
2001 2
3500 2
4000 2
4001 3

As you can see the folder name result changes for every 2000th item. So all the items with id between 1 and 2000 goes to the folder named “1”. All the items with id between 2001 and 4000 goes into folder named “2”. So on and on..

Note: once again you can always use elevated privilege code to create the folders on the fly as and when needed.

Below is the final outcome of this solution:

Since we now have the library name and folder name we can build the complete path/url easily. The format will be http://yoursitecollection.com/libraryname/foldername/itemname. Using this and wrapped between elevated privileges if required we can always upload the file as per the derived location.

Example:
http://yoursitecollection.com/Repo1/1/1.xml
http://yoursitecollection.com/Repo1/1/1500.xml
http://yoursitecollection.com/Repo1/1/2000.xml
http://yoursitecollection.com/Repo1/2/2001.xml
http://yoursitecollection.com/Repo1/2/3988.xml
http://yoursitecollection.com/Repo1/2000/4000000.xml
http://yoursitecollection.com/Repo2/1/4000001.xml
http://yoursitecollection.com/Repo2/1/4001390.xml and so on and on….

I will soon provide the code to create the library/folder on the fly and also the code to upload the item to the derived location.

Remove/Hide/Customize InfoPath Forms Tool Tip

On your sharepoint front end servers, go to the following location
C:\Program Files\Common Files\Microsoft Shared\Web Server Extensions\12\TEMPLATE\LAYOUTS\INC\

Make a backup copy of ifsmain.css.
Then edit the ifsmain.css file as follows:
Search (ctrl + F) for the css class “.errorDiv”, it is something like below:

To hide/remove tool tip:
.errorDiv
{
z-index:100;position:absolute;top:0px;left:0px;display:none;width:300px;padding:2px 3px; border:1px solid  #B22828;background:#FFFED7;color:#B22828;

font-family:Verdana; font-size:x-small; text-decoration:none;font-weight:normal;

}

Modify the above script by adding “!important” just beside display:none. The modified .errorDiv is as follows:

.errorDiv
{
z-index:100;position:absolute;top:0px;left:0px;display:none !important;width:300px;padding:2px 3px;
border:1px solid #B22828;background:#FFFED7;color:#B22828;

font-family:Verdana;
font-size:x-small;
text-decoration:none;font-weight:normal;
}

You can further customize the tool tips as per your needs if that is your requirement instead of hiding it.

The only drawback with this approach is that it will affect the complete server farm. Thus, all the infopath forms on all the sites will be affected with this change.

Update (12/1/09):

Good news is that we were able to figure out how to customize the tool tip specific to a site or page level thus avoiding the drawback mentioned in the above method of implementation. Using a content editor web part you can insert the required Html (also CSS) into a page. Leveraging this technique we were able to add a content editor web part (CEWP) to our custom application page which hosts the infopath form. This content editor web part envelopes the CSS changes required to the tool tip. Below is the CEWP content we added to our page:

<WebPartPages:ContentEditorWebPart runat=”server” __MarkupType=”xmlmarkup” WebPart=”true” __WebPartId=”{87D17157-ECD0-49D6-9906-2DAA4C400992}”>
<WebPart xmlns:xsi=”http://www.w3.org/2001/XMLSchema-instance&#8221; xmlns:xsd=”http://www.w3.org/2001/XMLSchema&#8221; xmlns=”http://schemas.microsoft.com/WebPart/v2″&gt;
<Title>Content Editor Web Part</Title>
<FrameType>None</FrameType>
<Description>Use for formatted text, tables, and images.</Description>
<IsIncluded>true</IsIncluded>
<PartOrder>1</PartOrder>
<FrameState>Normal</FrameState>
<Height />
<Width />
<AllowRemove>true</AllowRemove>
<AllowZoneChange>true</AllowZoneChange>
<AllowMinimize>true</AllowMinimize>
<AllowConnect>true</AllowConnect>
<AllowEdit>true</AllowEdit>
<AllowHide>true</AllowHide>
<IsVisible>true</IsVisible>
<DetailLink />
<HelpLink />
<HelpMode>Modeless</HelpMode>
<Dir>Default</Dir>
<PartImageSmall />
<MissingAssembly>Cannot import this Web Part.</MissingAssembly>
<PartImageLarge>/_layouts/images/mscontl.gif</PartImageLarge>
<IsIncludedFilter />
<ExportControlledProperties>true</ExportControlledProperties>
<ConnectionID>00000000-0000-0000-0000-000000000000</ConnectionID>
<ID>g_87d17157_ecd0_49d6_9906_2daa4c400992</ID>
<ContentLink xmlns=”http://schemas.microsoft.com/WebPart/v2/ContentEditor&#8221; />
<Content xmlns=”http://schemas.microsoft.com/WebPart/v2/ContentEditor”>&lt;![CDATA[<style type=”text/css”>
.errorDiv
{
z-index:100;position:absolute;top:0px;left:0px;display:none;width:200px;padding:2px 3px;border:1px solid #B22828;background:#FFFED7;color:#B22828;font-family:Arial;
font-size:xx-small;
text-decoration:none;font-weight:normal;
}
.errorDivClickable
{
z-index:100;position:absolute;top:0px;left:0px;display:none;width:300px;padding:2px 3px;
border:1px solid #B22828;background:#FFFED7;color:#B22828;
font-family:Arial;
font-size:xx-small;
cursor:pointer;cursor:hand;font-weight:normal;
}
</style>]]></Content>
<PartStorage xmlns=”http://schemas.microsoft.com/WebPart/v2/ContentEditor&#8221; />
</WebPart>
</WebPartPages:ContentEditorWebPart>

InfoPath Form HyperLink Open in Same Window

Problem: The hyperlink control in a browser enabled infopath form opens up in a new window. This might not be a good thing as a usability perspective. It might work for some and might not for many. This post is for those ‘many’.

Solution:

Note: This solution is valid only for the forms with managed code behind.

The solution I have is very trivial. Just drop a button on the form, stylize it to change its look and feel like an hyperlink. Then on the button click event of the form, just redirect the page to the URL you wanted to. There is a catch or two here.

A) On the click event, you make sure that the existing web request is completed before redirecting to your desierd page. So the code should look something like this:

HttpContext.Current.Response.Redirect(“http://somesite.com/page.html&#8221;,  false);

Passing the second parameter as ‘false’ we are ensuring that the current web request is completed and then redirected.

B) To make the button to be a hyperlink you need to do the following:

Right click the button select ‘borders and shading’, select None under presets. Then under the ‘shading’ tab select the radio button for ‘No color’. Then change the font color to blue(hyperlinks are usually blue) and make it underlined.

After doign all this there is still one thing that remains, i.e the mouse turning into a hand on hover over the button. To accomplish this, from file menu, select save as source files. From the source files, edit the view1.xls file, to set the style to cursor:pointer for the button element. Then open up the manifest.xsf in design mode. You will see the button as an hyper link including mouse hover.

Update (09/03/09):

There is a kind of caveat for the above implementation. Whenever the Response.Redirect is done, the new page from code behind of the InfoPath Form, eventhough the page is redirected, the URL in the browser address bar remains the same. It behaves as the Server.Transfer method.

To fix this anomaly the workaround is redirect to an intermediary page which in turn redirects to the actual page you want to redirect. The intermediary page could be a simple page with java script redirect method.